Automated deployment using GitHub actions for your DNN Extensions
Learn how to automate deployment for DNN extensions using GitHub Actions. Setup PolyDeploy, configure GitHub Secrets, and create a workflow file for easy deployment. [Read more here](URL).
.](/_astro/default-blog.SsrASij7_Z1LGv7l.webp)
Over the past year I’ve spent a lot more time than I would have expected working in GitHub Actions. Prior to the past few weeks I brute forced my way through actions primarily around Jekyll and some of the sites I converted off of DNN to static Jekyll-based content.
Recently though, a client of mine asked that I help to set up a deployment pipeline for one of their DNN-based websites, so I spent quite some time getting things figured out from a DNN perspective. This blog post is a result of that work plus additional time spent cleaning up the process to try to come up with something useful for other DNN Developers to use in their own custom modules.
Summary
TL;DR check out this GitHub Workflow for Continuous Deployment for DNN extensions
A quick summary before I go into a lot more details below: I’ve set up a GitHub workflow that is designed to run in a DNN module’s repository on GitHub, specifically one that is built using my DNN Templates for Visual Studio and leveraging the https://github.com/cantarus/polydeploy module for remote deployment. The action will set up the environment so that it can grab the deploy client executable, compile the module in release mode to build the INSTALL zip package, and then upload that zip file to the website configured as the deployment target.
Assumptions
- You’ve already installed Cantarus’ PolyDeploy module on a website to which you will be deploying your module. I used Brian Dukes’ fork.
- You’ve got a module that follows along with my standard extension development templates. This means you’ve got a solution in the same directory as the project file, and you already have the ability to compile the module in Release mode to create INSTALL and SOURCE packages.
- Change the references for DNN — instead of grabbing the DLLs out of the BIN folder, use the NuGet package manager to install the DotNetNuke.Bundle package. You can see all the packages that I have registered for dnnSimpleArticle.
Details
Now let’s get into the details on how to set up your own DNN Extensions to use GitHub Actions for automating their deployment.
PolyDeploy
The workflow depends on you having Cantarus’ PolyDeploy module installed and running on a DNN site that you will be deploying to. I started with Brian Dukes’ fork of PolyDeploy as he has done some cleanup that hasn’t been merged back into the original repo. You need to download the INSTALL package and install that on your production (target) website.
Once installed, you need to set up a new API user. That user will be provided with an API Key and Encryption Keys that you will need to add as GitHub Secrets. These values are only visible when you create the account.
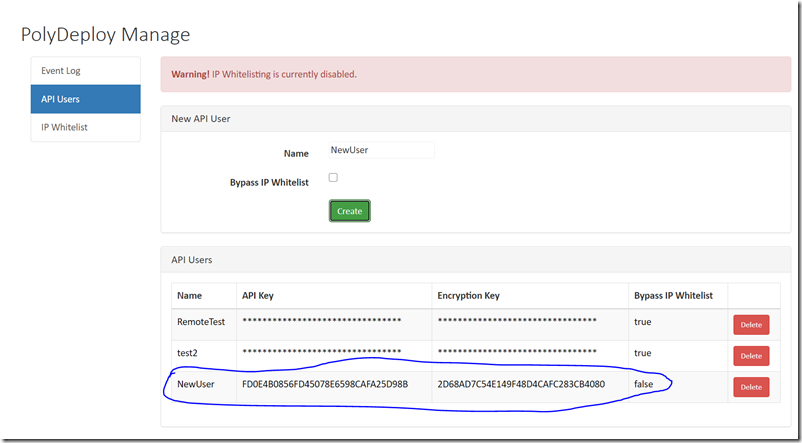
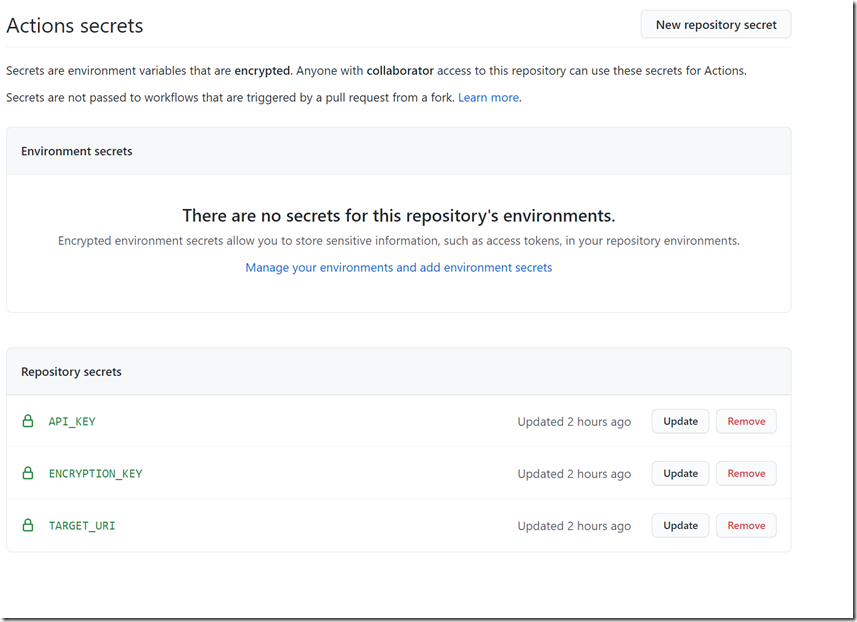
GitHub Secrets
These provide the credentials and security to allow access for the script to deploy your extension. You should protect these because with this information anyone can upload extensions/code to your website. In your GitHub repository (for your extension), you will need to create three secrets: API_KEY, ENCRYPTION_KEY, and TARGET_URI.
The Workflow File
You will need to configure a workflow file in the path .github/workflows in the root of your solution/project. You can check out the workflow that I have configured for dnnSimpleArticle here and use it as your base. Replace the module name throughout (e.g., dnnsimplearticle). The YAML file can be named anything, likely something matching your project/solution name.
Dig Into the Workflow
The workflow is built using the windows-latest image to easily compile the .NET project. It executes on pushes to the main branch.
deploy-module:
  runs-on: windows-latest
It checks out the repository and adds MSBuild to the path:
- name: Checkout
  uses: actions/checkout@v2

- name: Add msbuild to PATH
  uses: microsoft/[email protected]
Then it downloads and extracts the DeployClient:
- uses: robinraju/release-downloader@v1
  with:
    repository: "bdukes/polydeploy"
    fileName: "DeployClient_00.09.03.zip"
    tag: "v0.9.3-custom"
    out-file-path: "polydeploy"

- name: Unzip PolyDeploy Client
  run: |
    Expand-Archive -Path 'polydeploy\DeployClient_00.09.03.zip' -DestinationPath 'polydeploy\out\'
  shell: powershell
Restore NuGet packages and build the project:
- name: Restore NuGet Packages
  run: nuget restore dnnsimplearticle.sln

- name: Build and Publish Web App
  run: msbuild dnnsimplearticle.sln /p:Configuration=Release
Get the version from the manifest and copy the install package:
- name: get-version-from-dnn-manifest
  uses: valadas/[email protected]
  id: getversion
  with:
    manifestPath: dnnsimplearticle.dnn

- name: Copy Install Package to deployclient folder
  run: |
    cp install/DNNSimpleArticle_${{ steps.getversion.outputs.versionString }}_Install.zip polydeploy/out/DNNSimpleArticle_${{ steps.getversion.outputs.versionString }}_Install.zip
  shell: cmd
Run the deploy client to push to the production site:
- name: Run DeployClient to upload Zip to Production
run: |
cd polydeploy/out
DeployClient.exe --no-prompt --target-uri ${{ secrets.TARGET_URI }} --api-key ${{ secrets.API_KEY }} --encryption-key ${{ secrets.ENCRYPTION_KEY }}
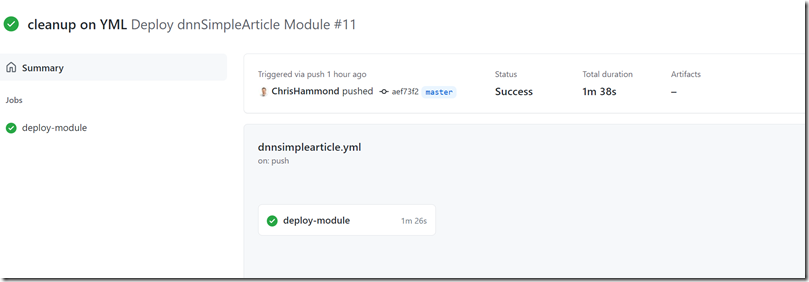
shell: cmdYou can track the status of the workflow via the Actions tab. You’ll see early attempts and current workflow logs there.
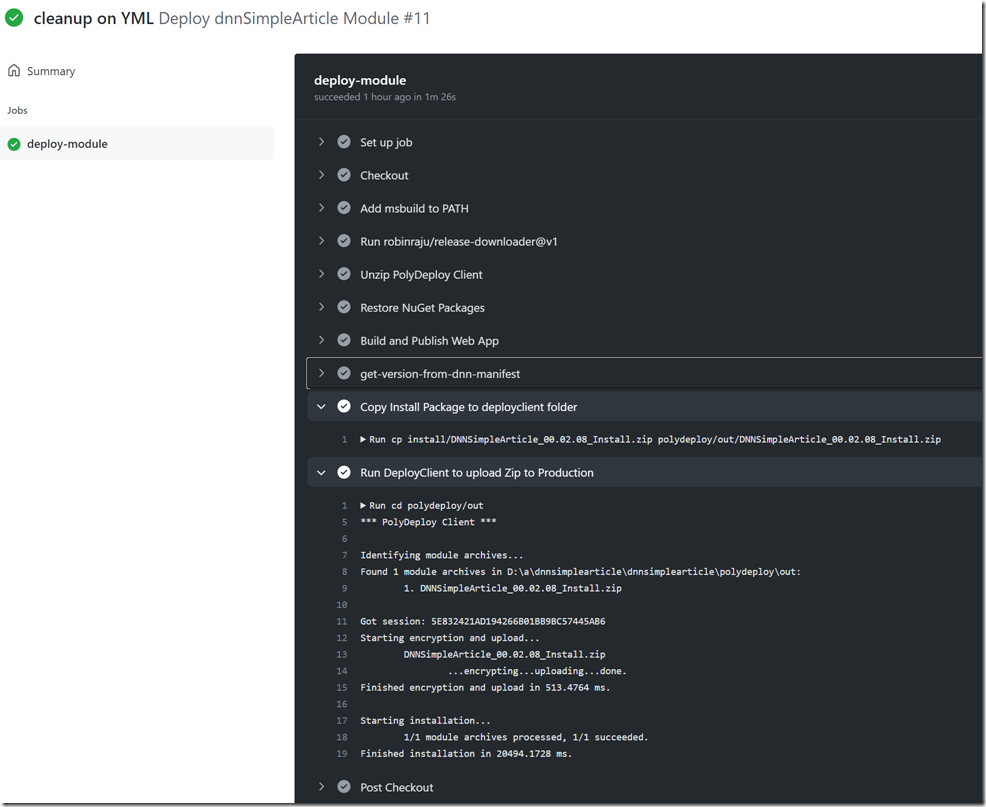
Clicking on a job provides detailed logs for debugging:
On your production site, the PolyDeploy module provides an event log:

I’m not claiming this is the most efficient way to do automated deployments for DNN extensions, but for now, it works well enough for my use case. I may make some tweaks to this over time. This also doesn’t cover specifics of your development workflow. For me, any code I check in on the main branch gets compiled and deployed.
If you don’t want that behavior, you might do most of your work in feature branches and only merge into main when ready. Or you might want to live dangerously and deploy early and often — that’s my approach.
A note of thanks: Brian Dukes helped give me some breadcrumbs as I went down this journey. I always appreciate his help!
